 |
|


 Jun 24, 2006, 09:09 PM // 21:09
|
#21 |
|
Jungle Guide
Join Date: Aug 2005
Location: Germany
Guild: Phantom Commando
Profession: N/
|

Understood. Myself I work with Photoshop a lot too, though my focus is more on wallpapers then working on screenshots.
I like the one of your Necro, it's nice and dark. |

|
|
Jun 24, 2006, 09:17 PM // 21:17
|
#22 |
|
Desert Nomad
Join Date: Dec 2005
Location: The Edge
Guild: Tormented Weapons [emo]
|
Beautiful work Bethany. I've become a big fan.

|
|
|
|
Jun 24, 2006, 09:23 PM // 21:23
|
#23 |
|
Krytan Explorer
Join Date: Feb 2006
Location: Jersey
Profession: W/
|
Extremely impessive to me, I personally suck at photoshop and I have seen your stuff before and it looks very well thought out and done.
I would love to see your walkthrough on how to work with photoshop and such, cause ive been dieing to learn but suck with most online tutorials. Great work! |
|
|
|
Jun 24, 2006, 09:32 PM // 21:32
|
#24 | |
|
Grotto Attendant
Join Date: Feb 2006
Location: North Kryta Province
Guild: Angel Sharks [As]
|
Very nice work. Knowledge of Photoshop didn't make those pictures, an eye for beauty did.
Quote:
|
|
|
|
|
Jun 24, 2006, 10:00 PM // 22:00
|
#25 |
|
Lion's Arch Merchant
Join Date: Jun 2005
Location: Finland
Guild: Hoggies fan [club]
Profession: N/
|
Shame that chaos gfx is down atm tough...Most awesome site ever.
|
|
|
|
Jun 24, 2006, 10:04 PM // 22:04
|
#26 | ||
|
Frost Gate Guardian
Join Date: Jun 2005
|
Thanks for the nice comments. Well, for those who wrote some anyway.
Quote:
Quote:
 For the other, nice people; I should get back home tonight and like I said earlier, I plan on putting a step-by-step illustrated post. And I'd really like to see your own experiments. So post away please because like I said, I would like this to become a big workshop. Oh, and menikamatii, I'll try your method as soon as I get back, I want to see how it turns out.
|
||
|
|
|
Jun 24, 2006, 10:09 PM // 22:09
|
#27 |
|
Ascalonian Squire
Join Date: Jun 2006
Guild: Mythril Knights of Tyria
Profession: Mo/W
|
This was one I made a while back: http://i4.tinypic.com/15hondj.jpg
What do you think? ^_^ JPG quality and resize kinda killed it. XP |
|
|
|
Jun 24, 2006, 10:22 PM // 22:22
|
#28 |
|
Wilds Pathfinder
Join Date: Apr 2005
Location: In the clouds
Guild: [Sage]
Profession: E/
|
Love the shots. I don't have an imaging program to play around with.
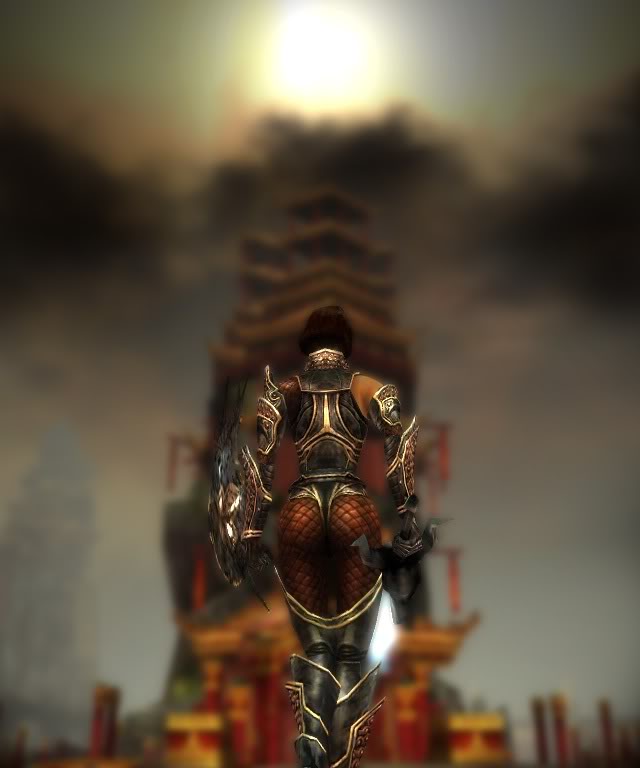
No criticizism from be but could I ask a request? All your shots completely blur out the background, maybe a bit to blurred. Could you maybe enhance certain objects in the background to make them stand out as well as the characters stand out? I like the one of with the tall castle stucture in it. Could you re-do that one and give more detail to that castle? Just wondering if it would look as good as what I picture in my mind. Good work! edit: Its the pic with your female in Kurzk armor (ya the one with the butt shot lol). I like how the sky is softened but would love to see some enhanced detail the the castle she is walking to. Get my mind thinking why is she going there? Whats in the castle? Does she want to go there or does she have to go? Last edited by beanerman_99; Jun 24, 2006 at 10:25 PM // 22:25.. |
|
|
|
Jun 24, 2006, 10:32 PM // 22:32
|
#29 |
|
Desert Nomad
Join Date: Apr 2006
|
ok, boredom makes bad things with ppl
heres my go in like 10 mins attached pre and post versionsgnight 
|
|
|
|
Jun 24, 2006, 10:55 PM // 22:55
|
#30 | |
|
Desert Nomad
Join Date: Jun 2005
Guild: The Amazon Basin [AB]
|
Quote:
|
|
|
|
|
Jun 24, 2006, 11:03 PM // 23:03
|
#31 | |
|
Frost Gate Guardian
Join Date: Jun 2005
|
Android Girl: I like it and I'd like to see it bigger. Photobucket can host your pics if you want. That's the one I use and it's free.
Beanerman_99: I know that Paintshop Pro is not as pricy as Photoshop. If you want a free imaging program there's Gimp. Although I don't know much about it except that it's free. As for the blur effect, the first thing I wanted to achieve was the 35mm effect. If you have ever used an SLR or DSLR camera, you'll notice that the main subject is crystal clear and the background is blurred a lot. I'll check the castle pic for you and see how I can modify it a bit. fb2000: The selective blurring is interesting. Quote:
Last edited by Bethany; Jun 24, 2006 at 11:08 PM // 23:08.. |
|
|
|
|
Jun 25, 2006, 01:26 AM // 01:26
|
#32 | |
|
Frost Gate Guardian
Join Date: Jun 2005
Location: California
Guild: Not Your Ordinary Guild
|
Quote:
|
|
|
|
|
Jun 25, 2006, 01:33 AM // 01:33
|
#33 |
|
Frost Gate Guardian
Join Date: Jun 2005
|
My recipe
Okay, I'm finally home and comfy. I managed to make this little recipe that is the one I use to craft my images. Bear with me because this is the first time I write something like so I hope it will be easy to follow. Here we go:
Step 1: An image. I decided to pick the introduction screen right after login in. Isako has, once again, agreed to pose for me, so here she is in regular screen capture.  Step 2: On the lower right on the Photoshop screen, I right-click on the image and choose Duplicate Layer. This effectively creates a copy of the image and it is placed right on top of the original image. Think of it as two plates of glass placed on top one another. 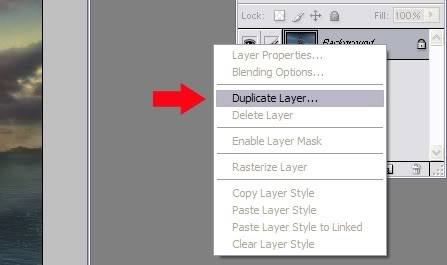 Step 3: Now, let's blur our image. Remember that Photoshop will apply all effects on the top layer (the one we've just made) unless we tell it otherwise. this is exactly what we want. To do that, go on top, select filters, then Blur, then Gaussian Blur. 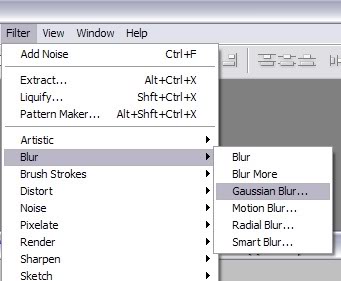 At this point, before Photoshop applies the Gaussian Blur, you must set the Gaussian effect. I usually set it at 3.0 pixels which provides a nice 35mm effect. 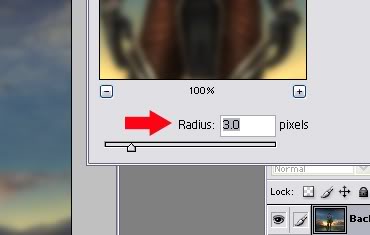 Step 4: At this point, this is the image we have: 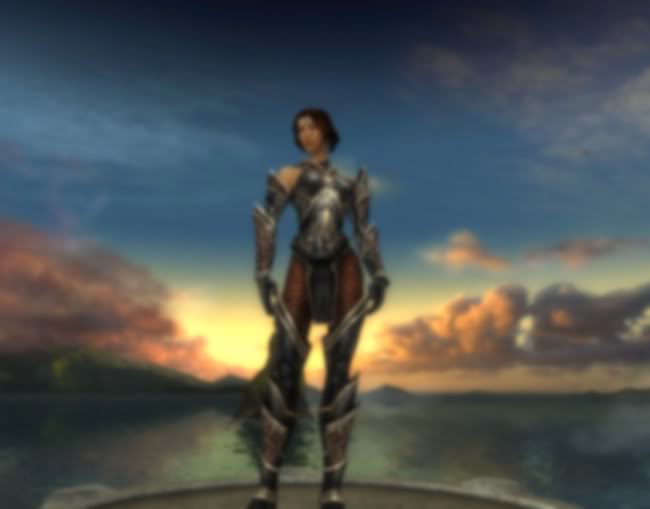 The nice effect of the Gaussian Blur is that it creates a faint and soft halo around just about everything. Isako here has not escaped this nice effect as you can see. Step 5: Now, we must uncover Isako from the blur. Now you'll notice that the blur is relatively strong and we must see very clearly what we are doing. In order to do this, go to the lower right again, select the opacity and set it at around 75%. Our top layer will become transparent enough to let us work. 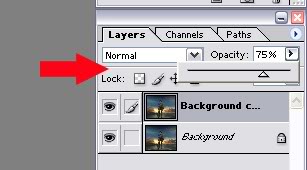 Step 6: If any of you in this thread mentioned using the Eraser Tool, well, they were right. But because of the Gaussian Blur, our erasing will let us cut Isako from the background all the while keeping our blur effect. Go to the side tools, select the eraser tool and set it's size at about Hard round 5 pixels.  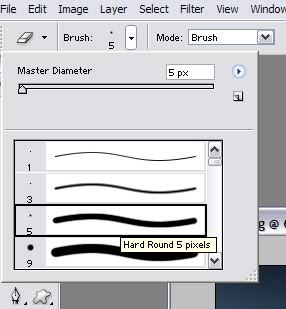 Step 7: Start erasing carefully around the character without going over in the background. Only erase the character itself. If a space is too small, select a smaller size. Keep on doing this until you've uncovered the character entirely. 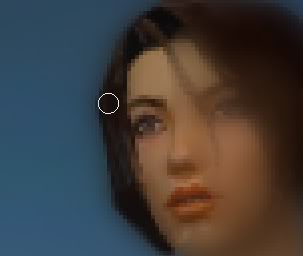 Step 8: At this point, my image looks like this: 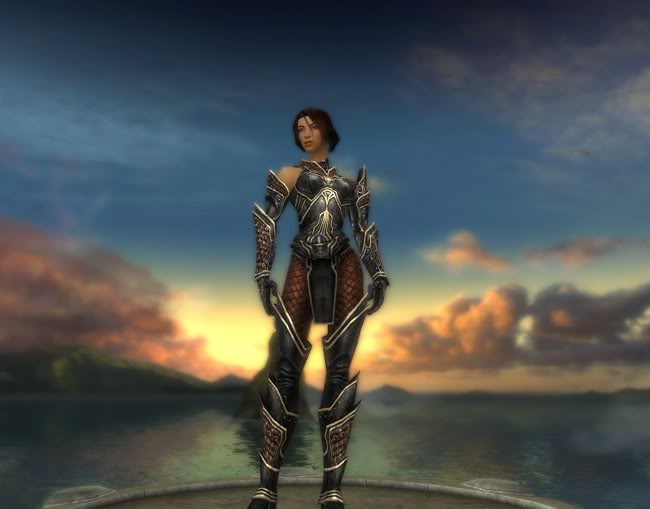 Step 9: This is the point where we don't need 2 layers anymore. Select Layer then Flatten Image. 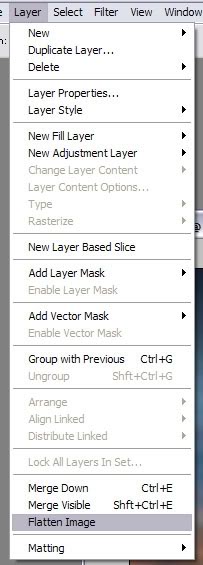 Step 10: Here, I usually use a lighting effect. Go to Filter, Render then Lighting Effects. 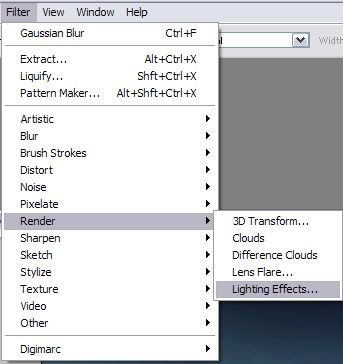 Step 11: We don't want our lighting effect to be too bright or anything. that's why I use the Soft Omni . But before applying the effect, notice the different options of the lighting effect? Set the Gloss to Matte . Leave the other ones like they are. Also, you can select the center of light and it's radius. Play with it and see what size pleases you more. Then click ok. 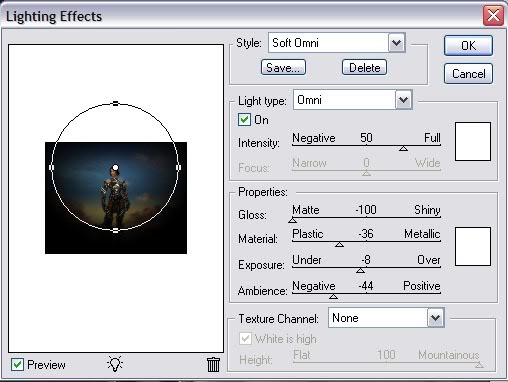 Step 12: At this point, my image now looks like this: 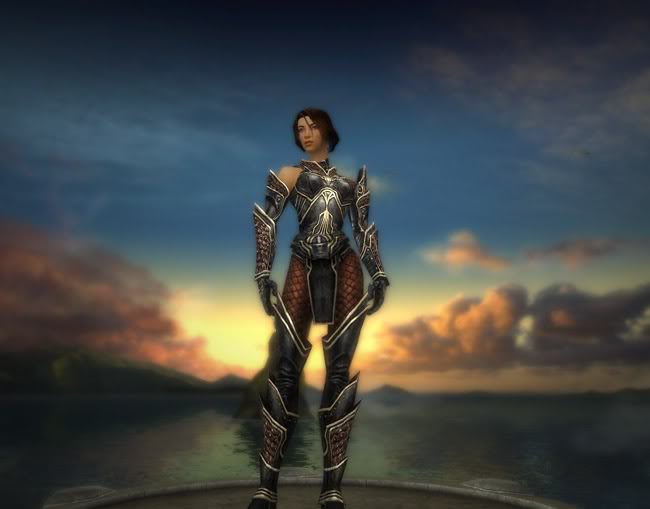 Step 14: Let's lighten the image. Some areas could use a bit of uplift in term of light. Isako's armor for instance has some nice gold linings that could benefit some exposure. For that, go to the left-hand side toolbar and select the Dodge tool. With this, everything you'll click or pass on will become brighter. 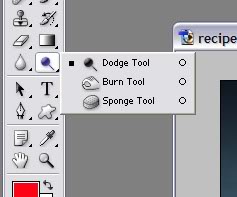 Here again, selecting the size of the brush is important. For Isako I wanted something not too large and not too small. I've selected Soft Round 35 pixels. 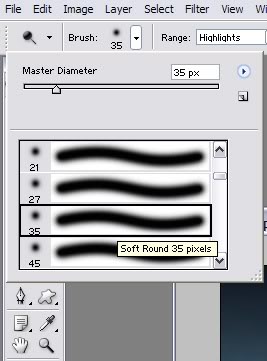 Step 15: Here's what my image looks like right now. Notice how Isako's armor has become brighter?  Step 16: We're almost done. Some areas need to be darker. Not too much, just a bit. For that, right-click on the Dodge Tool again and select the one right under: the Burn Tool. 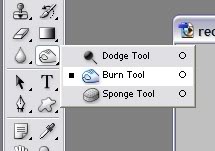 This one is the opposite of the dodge tool. Everything you'll click or pass on will become darker. Don't overdo it unless you want to set a special tone. If you go back to my first post, check the last image depicting my ranger Noa. Notice how much I've used the Burn Tool in order to achieve the incoming thunderstorm. By using the burn tool properly, you can provide with some nice dramatic effect. We're done. Easy huh? Now let's look at my result by comparing the original and the end result: Original image: Final image using the technique described here: 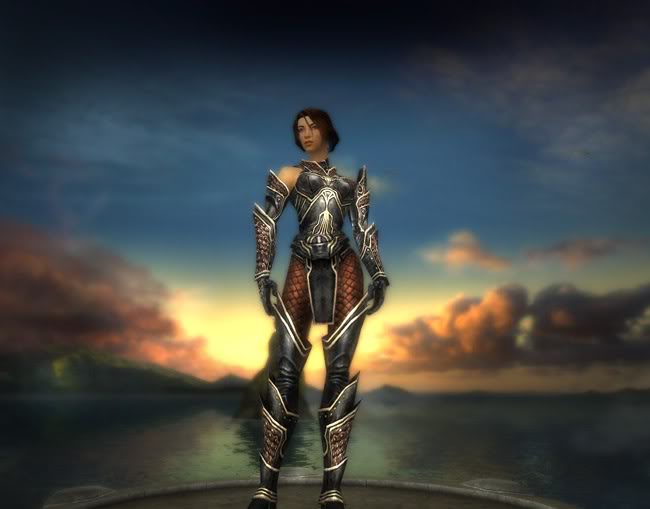 This is the same technique I used for all my screenshots. Of course, since the desired effect of each image is different some steps vary a bit but this is pretty much the general guideline I follow. It is also the result of many hours of experimenting with Photoshop because I'm too lazy to go look at tutorials (despite the fact that I wasn't lazy enough to write one  ). ). So fire up Photoshop, have fun and please post your results here for all to see. Bethany Edit: The effect isn't as dramatic as the other pictures but I lacked the time to hunt Cantha for a new shot so I lazily used the first one that popped-up after loggin in. Last edited by Bethany; Jun 25, 2006 at 01:43 AM // 01:43.. |
|
|
|
Jun 25, 2006, 01:41 AM // 01:41
|
#34 |
|
Lion's Arch Merchant
Join Date: May 2005
|
Oh wow, great pictures and an excellent tutorial! (I'm going to try this out as soon as I get some free time). Thanks, hopefully I can get images with as much mood as yours.
|
|
|
|
Jun 25, 2006, 01:57 AM // 01:57
|
#35 |
|
Lion's Arch Merchant
Join Date: May 2005
|
thanks alot for the tutorial! I'll give it a try later.
|
|
|
|
Jun 25, 2006, 02:21 AM // 02:21
|
#36 |
|
Lion's Arch Merchant
Join Date: Apr 2005
Guild: Nova Alliance [Nova]
Profession: R/
|
Yay
First of all, great guide. With a little time, and a little patience, I got this.
Considering that's a first try, this is a very very good guide ^_^ Last edited by Selena_Lionheart; Jun 25, 2006 at 02:52 AM // 02:52.. |
|
|
|
Jun 25, 2006, 02:31 AM // 02:31
|
#37 |
|
Forge Runner
Join Date: Jun 2005
Location: Dark Side of the Moon
Guild: Fat Kids Are Hard To Kid[nap]
|
Very nice pics, and very nice descriptions..GJ!
|
|
|
|
Jun 25, 2006, 02:43 AM // 02:43
|
#38 |
|
Jungle Guide
Join Date: Jan 2006
Location: California
Guild: None
Profession: Mo/N
|
I had a go at it with your method =P it was a quick job so i know it doesnt look as good, maybe the next one ill put more effort into it
I used a garbage picture anyways |
|
|
|
Jun 25, 2006, 02:51 AM // 02:51
|
#39 |
|
Krytan Explorer
Join Date: Nov 2005
Location: a box
Guild: I hop around
Profession: W/D
|
ok thx
|
|
|
|
Jun 25, 2006, 03:03 AM // 03:03
|
#40 |
|
Krytan Explorer
Join Date: Nov 2005
Location: a box
Guild: I hop around
Profession: W/D
|
 here can u do this for me? msg me in game if you do ( Kng Of Crunk )il tell u my email tell me if i need to make it bigger |
|
|
 |
|

«
Previous Thread
|
Next Thread
»
| Thread Tools | |
| Display Modes | |


 Linear Mode

|
|

All times are GMT. The time now is 03:14 PM // 15:14.
