 |
|
 Jan 19, 2007, 07:53 PM // 19:53
|
#1 |
|
Frost Gate Guardian
Join Date: Jun 2005
Guild: Earls Cendrée [TEA]
|
This is the third and last article in a series about maps, positional play and tactical movement. The introduction to the series can be found in the first article, so jump right in:
Basic movement and tactical play Having covered maps and common positions in the previous articles in this series, I'll continue on to movement, which is to say, how to achieve the various positions described before and how to force the opponent to go along with your gameplan. Here follows a brief explanation for how a few common movement patterns result in response and position. Please note that these are merely a few common plays, and by no means an exhaustive listing of all tactical movement possible in GvG. I make no claim of inventing any of the movements here - They are all common knowledge among more seasoned players, and evident to anyone in observer mode. Here we go. Flagstand rush. This is a very common occurrence, and is usually done through the front gate, going directly for the flagstand with the entire team, resulting in a Straight Fight. This kind of movement is pretty much the norm, unless one or both teams are proactively splitting. 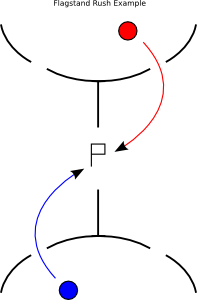 The purpose of this movement is to force the opposing team off the flagstand, gaining a morale advantage and hopefully following up with a Hall Push. Pincer play. This is a less common sight at the beginning of a match, but more frequently occurring on Circular maps where a split team might suspect a disadvantage at the flagstand against a strong 8 vs. 8 team. 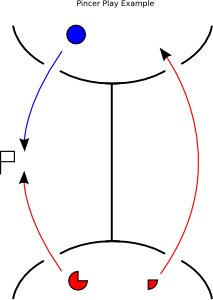 This movement often ends up in a Flagstand and Hall position, but if the opposing team chooses to do a Flagstand Rush, the flagstand split team might be forced back there meaning the position solidifies in a Dual Hall configuration. The purpose of this play is to force the opposing team to counter split - Hopefully unfavorably - causing an advantage either at the flagstand or in the opposing hall for the splitting team. Collapse. This is a common play when both teams are heavily split. It is more easily done on maps where movement is easy, such as Open or Triple Torus maps, but can usually be made to work on other maps with a bit of planning. 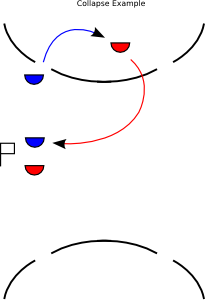 The purpose of this movement is to force a temporary numerical superiority by luring the enemy split further away from another fight and then rushing to the aid of another split. This play can often devastate a team that is taken unawares. Offensive split. This movement is often the result of an inconclusive Straight Fight, and easier to pull off if you have defensive capabilities enough not to fall even when outnumbered at the flagstand. This kind of movement can also be pulled from a Turtling position on some maps. 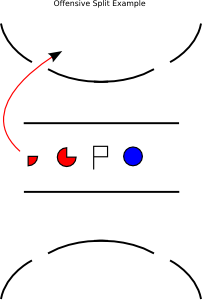 This movement works much like a Pincer Play, but does not have the time advantage of that movement. This means that in order to successfully pull it off, one might have to sustain some DP in order to attain a positional advantage. The purpose is, just like in the Pincer Play, to tear apart the opposing team, as they will eventually need to counter split unless your "defending" team gets wiped in short order. Defensive split. This kind of play is a very common response to a Pincer Play or an Offensive Split. It usually works by splitting off one or two self-sufficient characters to defend the base, whilst keeping the main part of the team at the flagstand or assaulting a Turtling opponent. 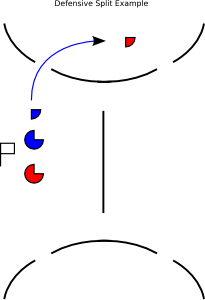 The purpose is of course to slow down the attrition rate of your own NPCs and ideally to either repulse the opposing split or wipe it out (opening the possibility of a Collapse movement back on the opposing main force). Hall Push. Usually performed with the entire team if the opposing NPCs are still around. This movement is the common followup to a Flagstand Rush and the natural answer to a Full Retreat. This movement can often be more of a pursuit if the opposing team is soundly beaten at the flagstand, and may yield a quick win for the pushing team. 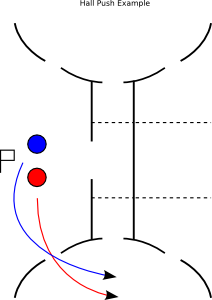 The purpose is to gain entry to the opposing guild hall with your entire team, hopefully forcing the opposing team to Turtle or even get in a quick lord gank whilst the opposing time is waiting for a res. In many guild halls a successful Hall Push with subsequent Turtle will also yield continual morale boosts for the pushing guild. Full Retreat. This is usually the start of a Turtle, and means a full withdrawal from the outside of your guild hall. Naturally, this is not a play one wants to make, but rather one forced on a team by superior force or tactics. 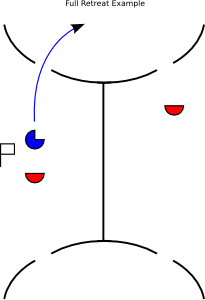 This is often a response to repeated monk kills at the flagstand, overwhelming pressure or numerous successful spikes. The purpose is to collect your forces and offer adequate resistance with the aid of the hall NPCs. Of course, the end target is not to stay Turtled until the end of the game, but rather to perform an Offensive Split or a Breakout. Breakout. When a team has been forced into a Turtle or Siege, the opposing team has no pressure on their NPCs and is likely receiving morale every two minutes. This is intolerable if one is already behind on NPCs. The answer is a push to break out of the guild hall, often followed by either a renewed Straight Fight or (more often) an Offensive split. 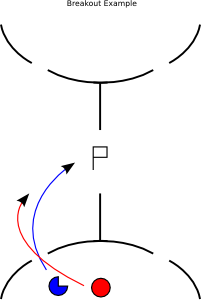 The purpose is to force the assaulting team into retreat by using a mistake made by them. This often manifests as a death of a midline support character with a key skill or a monk kill. Once the Breakout has started, momentum must be kept in order to realize the advantage to the full. In some rare instances, one sees a Breakout turn into a Flagstand Rush and then immediately a Hall Push. Balance Play. This is the movement used to punish a team trying to Breakout from under a Siege by a split team. With one split falling back in order to avoid the superior numbers of the team trying to Breakout, the other team moves in to attack the remaining NPCs or the guild lord. 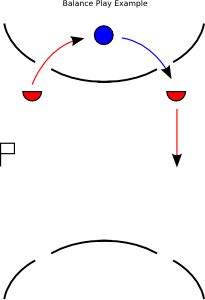 The purpose of this move is to force the opposing team to either lose the game, do a Defensive Split and risk your team wiping one of their (most likely DPed) splits, or do another Full Retreat. Most teams, especially teams with weak splittability like caster spike teams, will do a Full Retreat. If your the Balancing team managed NPC kills during the Breakout attempt, they made a gain, otherwise it just moved the game closer to VoD. Switch. This movement sees two splits switching relative position with each other. It usually manifests as the splits moving through each other at some point. Many times the switching team will take this opportunity to change the composition of the splits as well, in order to confuse the enemy. 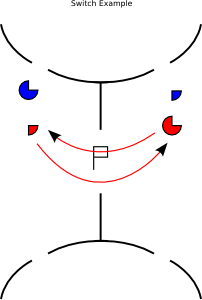 The idea behind this move is often to counter a successful Defensive Split or a Breakout from a Siege by reconfiguring an asymmertrically split team. A well carried out Switch will put both switching splits in better positions to do what they were designed to do. This concludes the Movement part of my tactics series. Hopefully, these three articles have somewhat enlightened, or at least amused you Last edited by Xanthar; Jan 20, 2007 at 08:35 AM // 08:35.. |

|

|
 Jan 19, 2007, 09:13 PM // 21:13
|
#2 |
|
Forge Runner
Join Date: Jul 2006
|
I just read all three of them. Guess I'll be the first to congratuale you on a great job.
Sticky! Sticky! |

|

|
 Jan 19, 2007, 09:35 PM // 21:35
|
#3 |
|
Lion's Arch Merchant
Join Date: Oct 2005
Location: Finland
Guild: Kuningas Kunta [Pipi]
Profession: Mo/
|
Good job indeed. While these being very basics of GvG I bet them to be very helpful for newer GvG players/guilds.
|

|

|
 Jan 20, 2007, 12:19 AM // 00:19
|
#4 | |
|
Frost Gate Guardian
Join Date: Dec 2006
Guild: Zealots of Shiverpeak [ZoS]
Profession: Mo/
|
Quote:
I bookmarked the page anyway Good job on the guide. I think new or less experienced GvG players will find a good use for it |
|

|

|
 Jan 29, 2007, 04:33 PM // 16:33
|
#5 |
|
Academy Page
Join Date: Jul 2006
Guild: Ice Cold Elements [ICE]
Profession: N/Me
|
Very nice, Im the kind of less experienced gvg player, and this will help me a lot, bookmarked for sure!
|

|

|
 Feb 14, 2007, 03:52 PM // 15:52
|
#6 |
|
Krytan Explorer
Join Date: Jun 2006
|
New to GvG here. Sticky!
|

|

|
 Feb 15, 2007, 05:10 PM // 17:10
|
#7 |
|
Desert Nomad
Join Date: Feb 2006
Location: USA: liberating you since 1918.
|
I like the scope of the article, for sure. But, tactics really comes from awareness, which comes from experience. I'm not sure breaking it down to a science and giving everything a name will help most gamers, tbh.
Otherwise, it's thorough and well planned, with lots of helpful advice. I think it's worth of a sticky, also. |

|

|
 |
|
«
Previous Thread
|
Next Thread
»
| Thread Tools | |
| Display Modes | |
|
|
All times are GMT. The time now is 05:38 PM // 17:38.


 Linear Mode


